Scenery
The easiest way to start building a Unity Animation is by importing a 3D Animation from 20-sim. First you build the 3D Animation in 20-sim with simple objects and make sure it is running correctly. Then you import the 3D Animation to Unity and use the power of Unity to create the Animation. Here we will show how this is done with the Scara Robot example model.
| 2. | From the Examples\2D Mechanics library drag and drop the ScaraRobot model. |
| 3. | Open the Simulator and run a simulation. |
| 4. | Put you mouse pointer on top of the 3D Animation and from the right mouse menu select Plot Properties. |

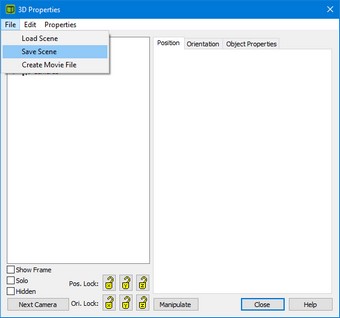
Opening the 3D Properties.
| 5. | In the 3D Properties from the File menu select Save Scene. |
| 6. | Click Yes to save the whole scenery. |
| 7. | Save the scenery in a location where you have read and write access using the name ScaraRobot.scn. |
Now the 3D Animation is stored in a scenery file.
Opening the 3D Properties.
Import in Unity
The next job is to import the scenery file into Unity and create a Unity Animation.
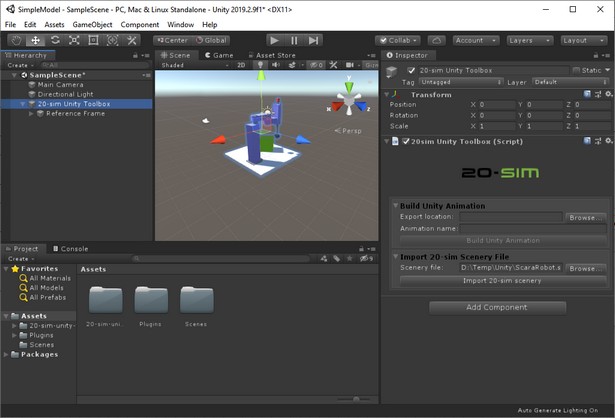
| 9. | From the GameObject menu select 20-sim and 20-sim Unity Toolbox. |
| 10. | In the Hierarchy at the left select 20-sim Unity Toolbox. |
| 11. | In the Inspector at the right go to 20-sim Unity Toolbox and Import 20-sim Scenery File. |
| 12. | Click the Browse button to find the scenery file ScaraRobot.scn. |
| 13. | Click the Import 20-sim Scenery button to import the scenery file. |
The Scara Robot should now be visible in the scene at the center.
Importing a scenery file in Unity.
Building the Unity Animation
Now we could work on the scene and enrich it by adding all kind of GameObjects. We will leave this up to your own imagination. The final part of the job is to create a Unity Animation, generate an .fmu file and import this into 20-sim.
| 14. | In the Hierarchy at the left select 20-sim Unity Toolbox. |
| 15. | In the Inspector at the right go to 20-sim Unity Toolbox and Build Unity Animation. |
| 16. | Enter the Export Location (a folder where you have read and write access) and Animation Name (e.g. ScaraRobot) and click Build Unity Animation. |
Importing the Unity Animation into 20-sim
| 17. | Open 20-sim with the Scara Robot model. |

Connecting the FMU.
The Unity Animation does not have any inputs. It uses global variables to connect the simulation to the animation. Therefore we do not have to make connections.
Running the Unity Animation
When you simulate the 20-sim model, a Unity Animation will pop up and run with the simulation. Generally the simulation will be much too fast to follow. Therefore we must force the simulation to run in real-time.
| 19. | In the Editor, from the Model menu select Start Simulator. |
| 20. | In the Simulator from the Properties Menu select Run. |
| 21. | In the Run Properties dialog click the More button and select Attempting Realtime Simulation On. |
| 22. | Click Ok to close the Run Properties dialog. |
| 23. | From the Simulation menu select Run. |
Now you will see a Unity Animation window appear showing the Scara Robot moving.
| 24. | Click Alt-Enter to change the Unity Animation from full screen to a window. |


