


Scenario Manager - Example |
  
|
You can see the toolbox in action with the example model Lifting System - Test Automation. We will run this model tow show you how the Scenario Manager can be used.
| 1. | In the 20-sim Editor go to the Library tab |
| 2. | In the Library tab select Examples - Signal Processing - Lifting System - Test Automation. |
| 3. | Drag and drop the model to the right to open the model. |
Now the Editor will look like:
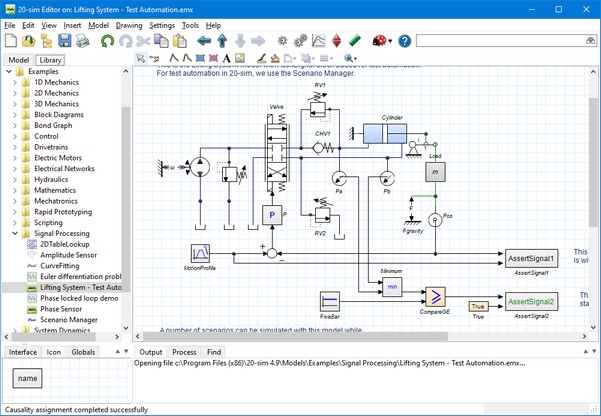
As you can see, in the model two AssertSignal blocks have been added.
| • | AssertSignal1 (Continuous): compares the actual position with the set-point position. If both deviate more that 5 cm, the output testResult goes from true to false. |
| • | AssertSignal2 (Boolean): The minimum value of the pressures in both chambers is compared with a constant signal of 5 bar. If any one of the pressures is lower, the output of the AssertSignal2 block testResult goes from true to false. |
We will use the two AssertSignal blocks to verify the outcomes of several Scenarios in the Scenario Manager.
Now we will open the Scenario Manager and run some scenarios:
| 1. | From the Tools menu select Scenario Manager. |
| 2. | Select Proportional Gains. |
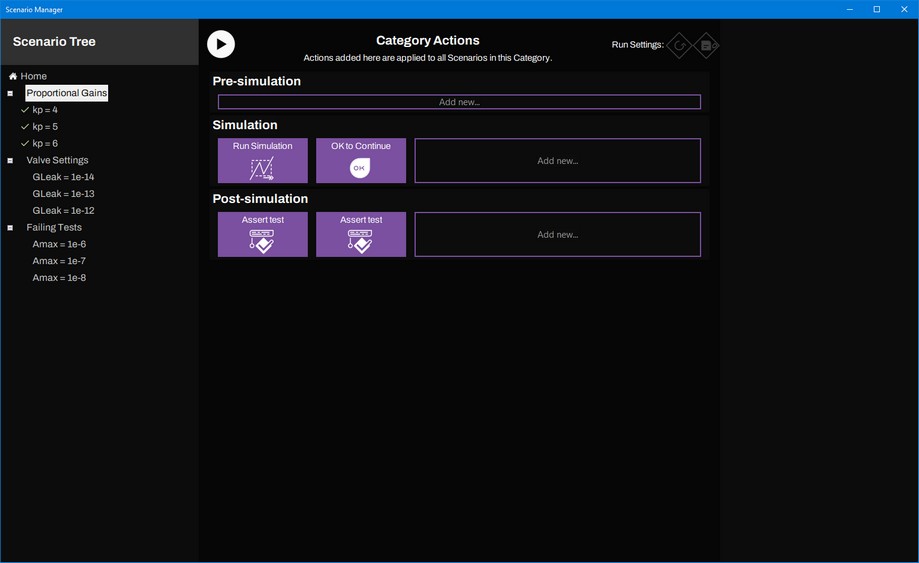
The Scenario Manager will look like:
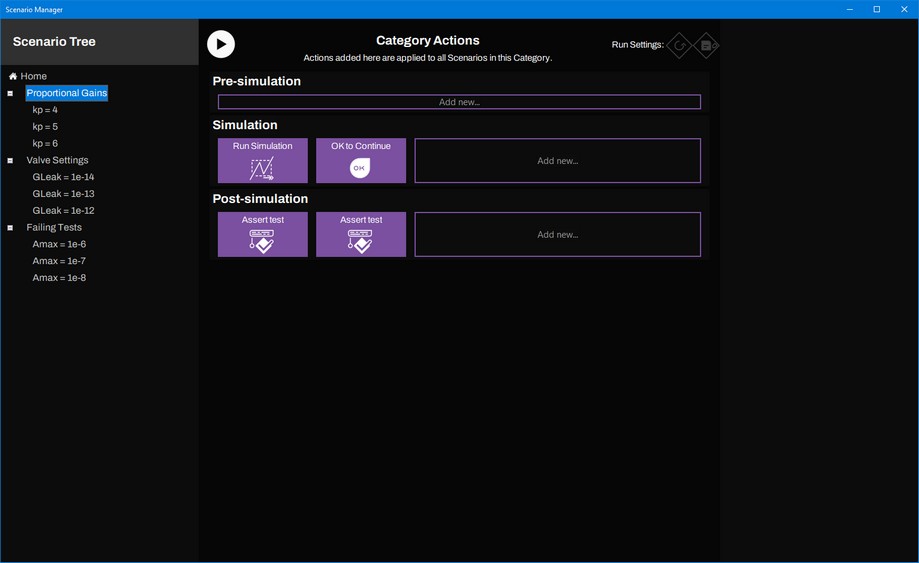
At the left in the Scenario Manager you will see a tree with Categories and Scenarios. Categories are listed directly under Home. In the picture above you see the category Proportional Gains, the Category Valve Settings and the Category Failing Tests. Under the Categories, the Scenarios are listed (kp = 4 etc, kp = 5, kp = 6, Gleak = 1e-14 etc.).
In the middle of the Scenario Manager, you can see the various Actions that have been selected. Each Action will perform a certain task. Actions are carried out sequentially, from the left to the right, and from the top to the bottom. In the picture above, the category Proportional Gains is selected. The Actions that apply for this Category are indicated in purple:
| • | Pre-simulation: The Actions that are shown here, are carried out before the simulation. In the picture above no Actions have been selected. |
| • | Simulation: The Actions that are shown here, are carried out during the simulation. In the picture above the Actions Run Simulation and OK to Continue are shown. |
| • | Post-simulation: The Actions that are shown here, are carried after a simulation. In the picture above the two Actions AssertTest are shown. |
| 3. | Select kp = 4. |
Now the Scenario Manager will look like:
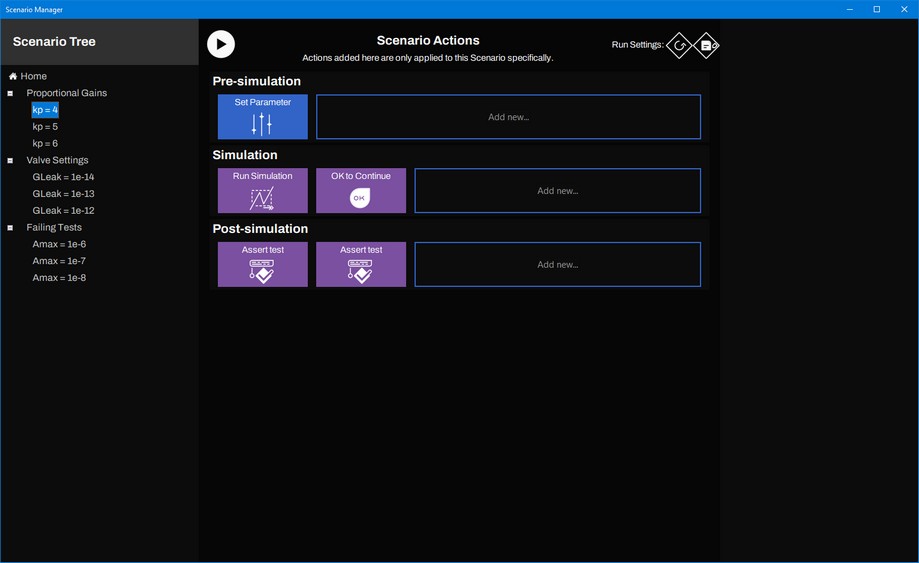
As you can see, the Pre-simulation bar shows one Action extra, Set Parameter. The color of the Actions is blue.
| • | Actions from a Category are shown in purple. |
| • | Actions from a Scenario are shown in blue. |
| • | When running a scenario, all Actions will be executed. |
In the Scenario of the picture above a parameter value will be set, the a simulation will be run followed by asking the user to press OK and then check the output of the AssertSignal modules.
| 4. | Open the 20-sim Simulator: In the 20-sim Editor click Model - Start Simulator. |
| 5. | Move the Simulator window on aside from the Scenario Manager window, so you can see both. |
| 6. | In the Scenario Manager choose the Category Proportional Gains |
| 7. | Click on the Play button |
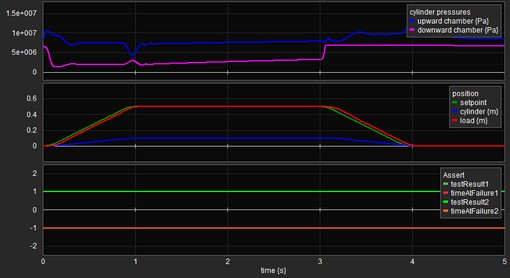
Now the first scenario of this Category will be run. In the Simulator window you can see the simulation run:
| 8. | Press OK after each run. |
After the three runs have been performed, the Scenario Manager will look like:
Left of the Scenarios, you will see V-signs indicating that the Scenarios were run successfully: the AssertSignal blocks have given a true output at the end of each run.
| 9. | In the Scenario Manager choose the Category Valve Settings. |
| 10. | Click on the Run category button. |
Now three Scenarios will be run without asking you to click OK. Left of the Scenarios, you will see V-signs indicating that the tests were successful.
| 11. | In the Scenario Manager choose the Category Failing Tests |
| 12. | Click on the Run category button. |
Left of the Scenarios, you will see red crosses, indicating that the tests were not successful: the AssertSignal blocks have given a false output at the end of each run.
You can also run a Scenario individually.
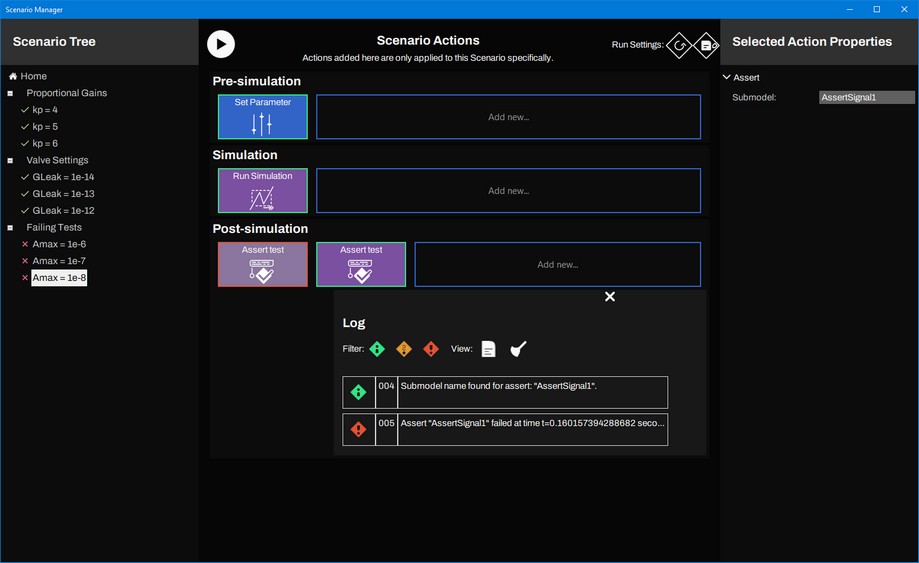
| 13. | In the Scenario Manager choose the Scenario Amax = 1e-8 |
| 14. | Click on the Play button. |
Now the Scenario will run. After the Scenario has been run, one of the Actions has a red edge. If you click on the Action, you will see the corresponding log. It will show that a time = 0.16 s the simulation output was deviating too much from the desired value.
You can inspect a module by clicking on it.
| 15. | In the Scenario Manager click on the Module Set Parameter. |
Now the Scenario Manager will look like:
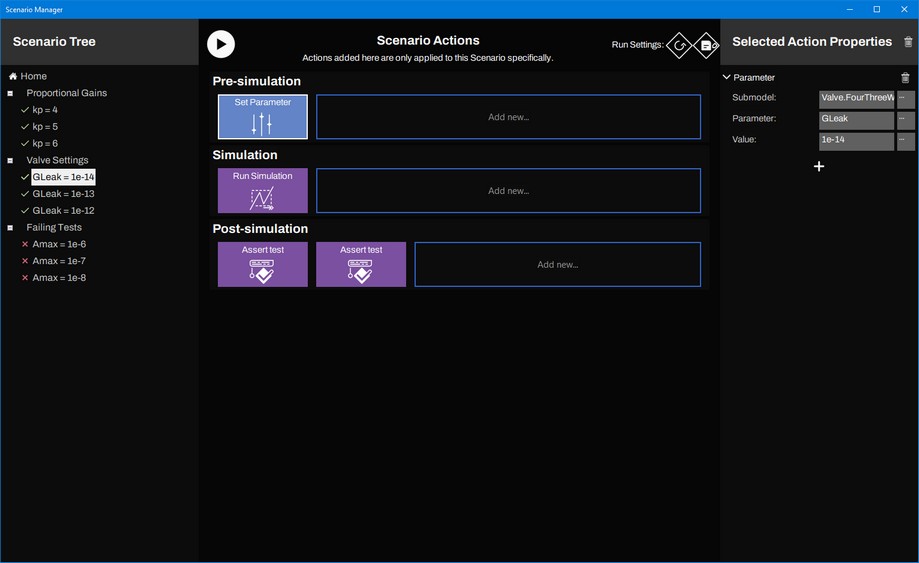
At the right of the Scenario manager, you can see the settings of this Action. It will set the parameter of the 20-sim model to a certain value. By clicking on the pencil buttons, you can change the settings.